Friday, March 25, 2016

Oil Change - 2003 Toyota Corolla LE

Let's get started! 

Changing oil is not a difficult job, specially on a Corolla (or majority of small sedans). Just like to share with you how I do it, hope that will help you in someway. 

I used to jack up the car using floor jack, but I found using a ramp is so much more easier. I bought this 16,000 lbs capacity Rhino Gear Ramps to do oil changes. They comes in pair. There is also 12,000 lbs capacity option, and it is cheaper, but I opted for higher capacity so I can use on other cars, even trucks. Who knows, maybe my next car will be a SUV! 

Anyhow, find a level surface, line up the ramps with your font wheels, and just drive the car up the ramp. Do it SLOWLY!!!  

Rhino Gear Rhino Ramps for oil change toyota corolla

My first try. As you see the wheel didn't quite line up, or the way I positioned the ramp is not quite good so 1/4 of the tire is hanging out. This is not a good example. 

Rhino Gear Rhino Ramps Not Good Example

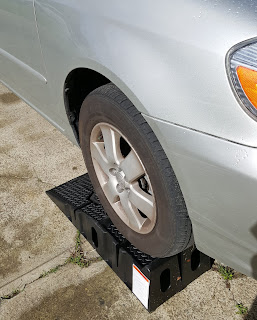
Redo the drive up. This time it's much better. 

Rhino Gear Rhino Ramps Much Better

Put the wheel chocks behind the rear wheels. These wheel chocks also comes in pair. 

FloTool Heavy Duty Wheel Chock on Rear Wheel of Toyota Corolla

Gear in "Park", and pull the handbrake. Now the car should be secure and is not going anywhere. Shut off the engine. 

Toyota Corolla hand brake and parking gear

Take a look at this! Plenty of room underneath the car to do the oil change, and many other repairs! 

Toyota Corolla on Rhino Gear Ramp

I had oil change at a shop last time. They used cheap looking regular oil filter. Which is fine and gets the job done, but I want to use better parts for my car when I am doing the job. 

Toyota Corolla Oil Filter and Oil Drain Plug

Socket wrench is necessary to remove the oil drain plug. Also, try to get your self one of those oil resistant latex glove. Keep your hands clean, also protect your skin. 

Toyota Corolla oil drain plug gear socket wrench and disposable glove

Unscrew the oil drain plug. This is pretty standard. Your owner's manual should clearly indicate where the plug is. You can also find tons of related videos on Youtube. 

socket wrench for oil change

Old oil drain plug (left) vs New (right). I said the new one looks pretty GOOD! 
Look for size M12 - 1.25 for Toyota Corolla. Check my previous post, I took a nice picture of the oil drain plug package. 

2003 Toyota Corolla Oil Drain Plug (Old vs New)

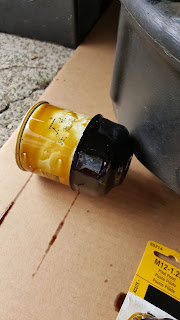
This cap-type oil filter wrench is very helpful. It makes removing used filter much easier.  

oil cap to remove old filter

Here is the new, FRAM oil filter designed for high mileage vehicles like my corolla. Looks much better than the old cheap regular white filter. 

FARM oil filter for high mileage cars

Put some new oil on the edge (O-ring) of the new filter to help make it a tight fit.  

FARM oil filter for Toyota Corolla

Hand screw the oil filter in place is good enough. No need to make it tight as hell. 

FARM oil fiter for Toyota Corolla

Now start pouring in oil. 

Mobil Full Synthetic 5W-30 Oil for Toyota Corolla

After you poured about 3 and half bottles of oil, you can slow down and start checking the dip stick. Make sure you don't add too much oil, which can hurt the engine. 

2003 Toyota Corolla oil dip stick

Clean and wipe the area you worked on. 

2003 Corolla oil change complete

Done! Start the engine and let it run a bit. Make sure there is no leak anywhere. 

Toyota Corolla oild change finish

You can stack these ramps together to save space. Love these ramps. Make the job much easier! 

Rhino Gear Rhino Ramp

Friday, January 29, 2016

Oil Change - 2003 Toyota Corolla LE (Necessary items)

Oil Change! These are the items you will need. Good thing about doing oil change on your own is it is fast and easy (with the right tools of course). Also, with the labor cost you saved, you can afford to buy the best quality parts for your car!

My Corolla has over 130K miles, so I use this nice FRAM oil filter, specially for cars with high mileage

Farm HM4967 Oil Filter

Full Synthetic, 5W-30 Oil. I bought four bottles. Mobil has nice quality oil. You can use any brand you want. 

Mobil Advanced Full Synthetic 5W-30 Oil


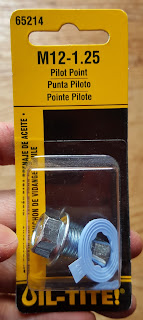
Oil drain plug. You don't really need to replace it, but I wanted to. Looks good too. 

Toyota Corolla Oil Drain Plug 65214 M12-1.25

FloTool 11930MI Heavy Duty Wheel Chocks, Set of 2. This is to be used with RhinoRamps for extra safety. In next post I will show more pictures of how I use it. 

FloTool 11930MI Heavy Duty Wheel Chocks


FloTool 11930MI Heavy Duty Wheel Chocks


 RhinoGear 11912ABMI RhinoRamps MAX Vehicle Ramp - Pair (16,000lb Capacity). This thing makes it so much easier than jacking up car. 
RhinoGear 11912ABMI RhinoRamps MAX Vehicle Ramp - Pair (16,000lb. GVW Capacity)


Friday, July 25, 2014

03 Corolla LED light upgrade - interior map light


Cheap upgrade PART II: Change 2003 Toyota Corolla interior map lights with bright, aftermarket LED light bulb.

Following up with Part I, where I replaced interior overhead dome light. It was a lot of fun and I loved the result. So it in only natural that I replace the map lights as well.

I went out and purchased a set of these 12V T10 5SMD (or SMD 5050) LED light bulbs. They are fairly inexpensive and come in sets of 4. You only need two, but you can keep the rest or put them in some where else.


Here is a close up of what the LED light bulb looks like


First, remove the clear plastic cover. It is pretty easy, I pried it off with just my finger nails. 


You will need a plier with long tip like the one shown below. These pliers are called "Needle Nose Plier" It will help you get into that tight space to pull & remove the factory light bulb 


This would be the "hardest" part. Carefully insert the plier into the tight space, gently wiggle and pull the factory light bulb out. You don't need apply a lot of force, but you do need to be careful. You really don't want broken glass in the socket.  


Stock light bulb compare to the LED light bulb


Insert the LED light bulb into the socket


Test if the light bulb lights up. If not, try pull it out, turn the metal contact on the end of bulb the other way (reverse) and try it again. 


LED vs the stock light bulb. Notice the difference, even in broad daylight! 


Put the plastic cover back


Looking good! 


The result was pretty awesome. I love the bright light, specially during the night. The natural white light is really easy on the eyes and they look great! 


Hope you like this upgrade. Next up: LED head light! Stay tuned! 

See Part I here


Thursday, July 10, 2014

How to repair this, any suggestion?

One of the hinge on the door broke off, so I just took the whole thing out.

Anybody got any suggestion as what I can replace it with? Where to get the matching color & style? Or replace the entire center console with something else?


Friday, July 4, 2014

03 Corolla LED light upgrade - interior dome light


Cheap upgrade PART I: Change 2003 Toyota Corolla interior dome light to a bright, aftermarket LED light bulb.

The yellowish interior dome light is weak and depressing, so I want to brighten things up. I went ahead and bought the inexpensive 12V 31mm SMD LED Light Bulbs to replace the dome light.

It is pretty easy to remove the plastic cover of the dome light. I just use my finger nail to pry open the cover alone the edge.

Factory light bulb. 


It is pretty easy to remove the light bulb. First, slide the light bulb towards the "hook shape" metal spring to the other edge of the bulb comes free.  


Pull the light bulb out as the shown in the arrow. No tools needed! 


This is the factory light bulb. Don't throw it away, keep it somewhere safe. You might need it in the future for different applications, you never know. 


This is the 12V 31mm SMD LED Light Bulbs I bought online. They are fairly inexpensive, so I just bought a pair. After you see its cheap price, you might feel like buying more :D


Place the LED light bulb into the socket.


Let there be light! I love the white LED, looks awesome! 


The light bulb is really bright, I took this shot during day time and it still looks very nice. I will took another shot at night and you will see the difference. 


This is a cheap and useful upgrade. I am very happy with the result and wonder why I didn't do it sooner. 

Stay tuned for PART II, where I will upgrade the two map lights under the rear view mirror!